• 1-848-200-0995
  • Log in
  • Cart (0)
  • Checkout
  • Home
  • Shop By Brand 
    • Zooz
    • Aqara
    • Ezlo
    • Fibaro
    • Hubitat
    • Qubino
    • Vision
  • Product Type 
    • Hubs and Controllers 
      • Hubs (Gateway Controllers)
      • Remote Controls
      • Scene Controllers
    • Lighting Controls 
      • Wall Switches
      • Smart Relays
      • Smart Bulbs
      • RGBW and LED Strip Control
    • Sensors 
      • Door / Window Sensors
      • Humidity Sensors
      • Motion Sensors
      • Multisensors
      • Outdoor Sensors
      • Temperature Sensors
      • Vibration Sensors
      • Water Leak Sensors
    • Water Valves
    • Smart Plugs
    • Sirens and Chimes
    • Range Extenders
    • Thermostats
    • Blinds and Shades
    • Cameras
    • Accessories
  • Shop By Hub 
    • Z-Box Hub
    • 2GIG
    • ADT
    • Ezlo
    • FIBARO
    • Home Assistant
    • HomeSeer
    • Hubitat
    • Nexia
    • Qolsys
    • SmartThings
    • Wink
  • Value kits
  • Pro Portal
  • Help 
    • Zooz Support Portal
    • Zooz Community
    • Z-Box Support Portal
    • Z-Wave Resources
    • Blog
    • Contact Us
THE SMARTEST BLOG

How to install Device Handlers in SmartThings

July 15, 2016 18 Comments

How to install a custom device handler in smartthings

For those of us interested in home automation, this might be a familiar scenario: You’ve bought that new 4-in-1 sensor you’ve wanted for a while, and rush to unwrap the package like a kid on Christmas Day. Then you insert the batteries and make your way to your SmartThings hub to include it into your network. And then the disappoint descends: it’s a sensor that’s new on the market, and it’s more complicated to integrate it than a simple on/off device. It will probably take a while before SmartThings provides official support for it. So how do you include a Z-Wave device to your hub if it's not on the list?

This is where custom device handlers come in: community members will often develop their own code to be able to use new devices with SmartThings. They usually publish them on development platforms like GitHub and then post a link to the code on the SmartThings forum. But they don’t always include instructions on how to install the custom device handler and assign it to the device. The average user may think it’s a complicated process, when in fact it’s quite simple!

Here are some instructions that should help you get a custom device handler (i.e. that awesome new device of yours!) to work in SmartThings. I’ll be taking the Zooz 4-in-1 Sensor as an example, but this process will work for any device that needs a custom handler (you’ll just need to use a different link for the right code).

How to add a device handler for the Zooz 4-in-1 ZSE40 sensor?

1. Log in here with the same username and password you use for your SmartThings app: https://consigliere-regional.api.smartthings.com

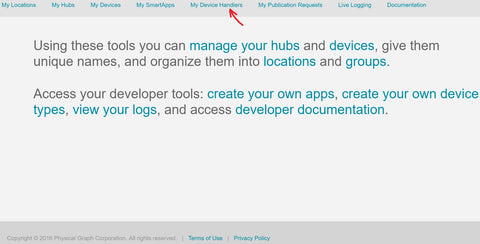
2. Click on My Device Handlers in the top menu

How to install a custom device handler in SmartThings

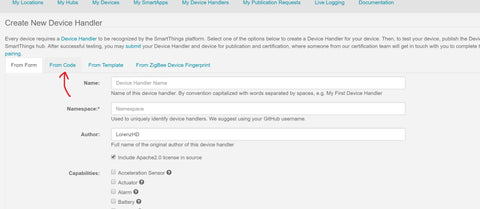
3. In the top right corner, click on Create new device handler and choose From code from the top tab menu. You'll be presented with a blank area where you can copy the code from this link and paste it in (it's always best to use the raw version of the code)

https://github.com/krlaframboise/SmartThings/blob/master/devicetypes/krlaframboise/zooz-4-in-1-sensor.src/zooz-4-in-1-sensor.groovy

How to install a custom device handler in SmartThings

How to install a custom device handler in SmartThings

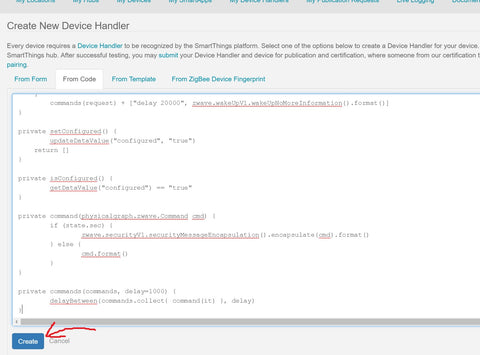
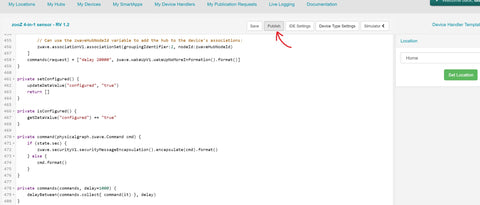
4. Next, scroll to the bottom and click Create. Now click Save, then click Publish > for me.

How to install a custom device handler in SmartThings

How to install a custom device handler in SmartThings

You should now see this device type in your list of Device Handlers

How to assign a custom device handler to my Z-Wave Device

Simply exclude the device if you had included it prior to installing the new device handler. Then add the device to your SmartThings hub by clicking on Add thing > + Connect New Device in your app. Press and release the Z-Wave button on the sensor twice quickly.

Remember to keep the device within 3 feet away from your hub during inclusion — the device should be automatically discovered as the Zooz 4-in-1 sensor. Then, leave the sensor by the hub for a few hours so it can fully configure.

And that should be it! I hope this was helpful in simplifying the process behind custom device handlers. Feel free to share your questions and feedback in the comment section below!


Tweet Share Pin It Email

10 Responses

Ward
Ward

February 01, 2023

I followed this guide a while back, and managed to get a ZigBee motorised blind to wotk with Home Assistant / Alexa.

Thank you for that :)

Will I be affected by this news from Samsung SmartThings… “we will start migrations of Groovy device DTHs”

https://community.smartthings.com/t/the-end-of-groovy-has-arrived/246280

Hope you can help.

Thanks.

Martin Bryan
Martin Bryan

February 01, 2023

Wow, this is incredibly useful! I cant tell you how many times I got a new smart switch and dimmer to test out and had this very issue. I am generally able to get it to work, but my G0d it takes a long time and tends to give me a headache.

The Smartest House
The Smartest House

July 14, 2020

You actually don’t need to use the SmartThings Classic app to take advantage of the custom device handlers. The instructions refer to the IDE portal and some handlers are not optimized for the new app but for the most part, the handler installation process is not related to the app you’re using at all.

Ole
Ole

July 07, 2020

IMPORTANT!!!
TO USE DEVICE HANDLER – INSTALL “SAMSUNG SMARTTHINGS CLASSIC” APP!!!
WON’T WORK WIH NEW ONE.

I’ve spent like an hour to figure out why I can’t find any place to add custom device…
Please update post with this info.

Jan (The Smartest House)

August 17, 2018

Hi Brian, this looks like an issue with the device handler. We don’t carry this particular product so don’t have any experience with getting it integrated with any Z-Wave system unfortunately. We recommend reaching out to the developer who wrote the code, it may be outdated and needs an update to conform to the latest platform standards on SmartThings.

Brian
Brian

August 14, 2018

I have read 5 different tutorials that all give the same instructions but when I hit “Create” I get this error: Org.springframework.security.access.AccessDeniedException: Run Locally Permission not allowed for DeviceType: d903c6b9-cf7c-4173-b72e-1fb06ba4b8ee

Why and how do I fix this? I’m trying to get my Remotec relay to work again since there no longer seems to be a Generic Z-wave Device option in Smartthings

Jan (The Smartest House)

December 22, 2017

Hi Paul,

It’s possible you need to reset the sensor first. Please try this:

1. Tap the menu icon in your SmartThings app
2. Tap Hub is online
3. Tap Z-Wave Utilities
4. Tap General Device Exclusion
5. The app will show this message: “Please follow the manufacturer’s instructions to remove the Z-Wave device from My SmartThings.” There will also be a spinning circle next to the message “Exclusion Mode Active”
6. While Exclusion Mode is active, click the Z-Wave button on the sensor with a paperclip 3 times very quickly
7. The app will confirm device exclusion
8. Tap Done

Once exclusion is completed, please try adding the device again by clicking on Add Thing in the ST app and clicking the Z-Wave button 3 times with a paperclip quickly.

Let us know if that helped!

Paul
Paul

December 19, 2017

I can not get my sensor to connect. I’ve installed the device handler, I go to “add a thing”, and I press the button on the bottom of the sensor with a paper clip twice quickly and it blinks 5 times. Smartthings never finds it and I’m within 3 feet from my hub. Any suggestions?

Jan (The Smartest House)

September 26, 2017

We’re glad that was helpful Lionel!

Lionel
Lionel

September 25, 2017

ok, got it, the inside switch is the wrong button, need to use the paper clip then it worked great.
thanks for the post!

1 2 Next

Leave a comment


Also in THE SMARTEST BLOG

You Need Z-Wave Long Range For Your Home Assistant Set-Up

November 29, 2024

Image showing Z-Wave and Home Assistant logos with a blurred background of a content and relaxed person sitting in a chair

Home Assistant is slowly but surely becoming the ultimate platform for comprehensive home automation. It allows users to create a truly customized and connected environment with the most integrations we've ever seen. Home Assistant has a pretty powerful automation engine too so you can program anything from simple lighting control to complex, multi-device routines. And it's open source which means we can all contribute and the basic software is free.

The secret to making your Home Assistant set-up better than ever? Add Z-Wave to it! You can instantly increase the functionality, reliability, and device compatibility of your smart home environment. Z-Wave brings a vast range of new device options that can communicate securely and consistently. They are feature rich with tons of advanced settings to choose from so you can find a good match for any use case. 

Continue Reading

Crack the Code: Grow And Retain Your Alarm Business With Z-Wave Smart Tech

October 22, 2024

Happy couple looking at a tablet in their kitchen

In today’s highly competitive alarm business, offering security alone is no longer enough. Customers are increasingly expecting more – they want smart security solutions that work seamlessly with their modern lifestyles. The great news for your business? If you already install alarm panels, there’s a good chance they come equipped with Z-Wave technology, a straightforward entry point to home automation.

Z-Wave is a robust wireless protocol that enables a wide array of smart home services, allowing you to move beyond the traditional boundaries of alarm systems and tap into the expanding market of home automation. By leveraging the already included Z-Wave protocol, you can offer your customers centralized control over lighting, thermostats, door locks, and much more – all from the convenience of their existing alarm panel. This not only enhances the value you deliver but also sets your business apart as an innovator in the security space. 

Continue Reading

Care Smarter, Not Harder: Budget-Friendly Smart Home Ideas for Caregivers

September 26, 2024

Portrait of two people hugging each other

Caring for aging parents or loved ones with limited independence is a journey filled with both emotional rewards and practical challenges. The emotional toll of balancing this responsibility with other aspects of life can be overwhelming. We want to share some helpful shortcuts from our field of expertise: smart home technology.

You'd be surprised how an inexpensive and simple system like a hub and a few connected devices can change your daily routine. With the guide below, we will help you create a supportive, secure environment tailored to your loved one’s needs, all while reducing the constant worry that comes with caregiving.

Continue Reading

Quick Links
  • About Us
  • Privacy Statement
  • Terms Of Service
  • Refund Policy
  • Contact US
Sign up for our newsletter

Be the first to know about new product releases and special sale events.

© 2025 The Smartest House.

American Express Apple Pay Diners Club Discover Google Pay Mastercard Shop Pay Visa